Share
Pin
Tweet
Send
Share
Send
Will need
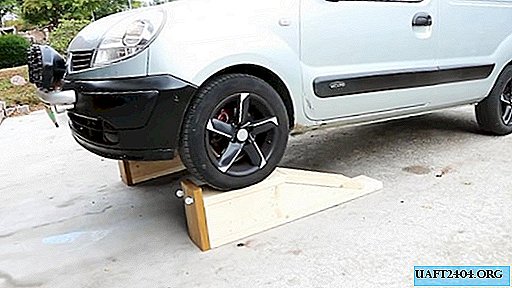
The easiest way is to make this device from wood, so we need to prepare:
- edged boards of the desired length;
- castors for furniture or trolleys - 4 pcs .;
- wood screws and nails.
In our work we will use the following tools and accessories: tape measure, ruler and marker, circular and pendulum saws, nailing guns, screwdrivers, clamps and hammers.
Order of operations
From six edged boards we produce a side ramp profile.

To do this, taking into account the size of the wheels and the front overhang of the car, we mark out an inclined line on one of them with a tape measure and a marker.
We saw the marked board with a portable circular saw. Using the first workpiece as a template, mark up the remaining five and also saw them.


We lay four side profiles in pairs in parallel on a flat surface with the base up and at a calculated distance from each other.
For each pair of side profiles, we lay flush on the board with their ends. Using a nailing gun, we fasten these elements of the ramp with nails, which we finally finish with a hammer.


To control the ruler, we measure in several places the distance between the side profiles. From the fifth and sixth blanks with contours of the side profile we cut off with a pendulum saw two pairs of rectangular bars taking into account the measurements taken.

We insert them at the beginning and end of the straight sections of the side profiles, which will serve as struts and amplifiers at the same time. We fix them with nails from the outside.
The remaining wedge-shaped elements are laid between the inclined sections of the side profiles and, having fixed one nail with a nail in a suitable place from above, we fasten it from below through the base board.

We cover the board, combining its end with the ends of the side profiles, the upper horizontal platform and make a mark on it for the transverse section.

Nail the short part of the board to the horizontal section of the side profiles. We attach the long part to the short part and fix it with nails to the inclined section.

We open the ends of the ramps with a board and cut it off slightly above the top of the horizontal platform. This protrusion will serve as a limiter for the wheels, preventing them from rolling off the site. We also fasten them to the ends with nails.

To the upper part of the restrictive element, we crossly fasten two rollers from below using screws and a screwdriver. The rollers will allow the ramp to be moved if necessary by rolling, which is much easier than carrying it on a weight or drag.


Check ramp in business
We roll up and lay the ramp in front of the front wheels of the car.

Carefully feed the car forward, overcoming the inclined section of the ramp, we call the front wheels on a horizontal platform. We put the car on the hand brake. Also, it will not be amiss to substitute an emphasis under the rear wheel.

We make sure that the distance from the floor to the bottom of the car has become quite spacious and you can easily sit under it for a routine inspection or repair.

After completing the work, carefully drive off the ramp and remove it to a secluded place where it will be located until the next use.

Share
Pin
Tweet
Send
Share
Send

